Sunday, January 30, 2011

mango mousse & mirror

This post goes alongside my previous one of the Daring Baker's Challenge: Biscuit Joconde Imprimé/Entrement. As I said before, I used a mango mousse and mirror as my entrement for the joconde, and it turned out beautifully. Tasted good, too, I heard.

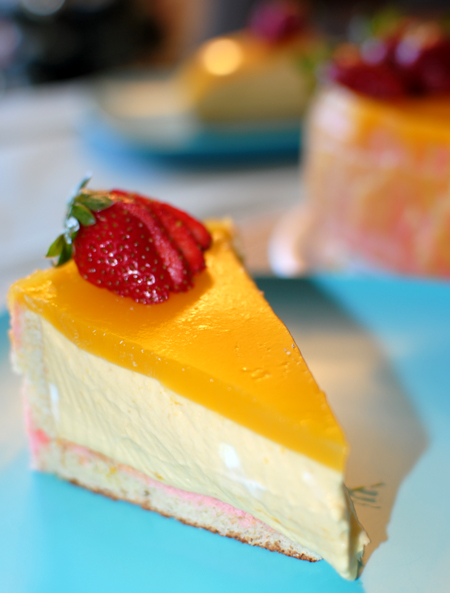
The mirror is definitely optional, but if you plan on using this mousse in some sort of layer spongecake dessert, it's a very pretty finishing touch. I'll give you the recipe for both, both of which are relatively simple. 


Mango Mousse & Mirror
Adapted from make life sweeter!

For the mousse, you'll need:
  • 1 1/2 cups cold whipping cream
  • 1/3 oz gelatin
  • 1/3 cup cold water
  • 2 1/2 cups mango puree (about 2 1/2 large mangoes)
  • 3 1/2 tbsp confectioner's sugar
  • 1 tsp mango essence

For the mango mirror, you'll need:
  • 1/3 oz gelatin
  • 1/2 cup cold water
  • 2 tbsp granulated sugar
  • 1/2 cup mango puree (about 1/2 mango)

To prepare the mousse, whip heavy cream until it forms stiff peaks and put in the refrigerator. In a small bowl, mix gelatin and water. Let sit a few minutes. Meanwhile, combine mango puree, mango essence, and confectioner's sugar until well incorporated. Heat gelatin mixture in microwave in 15-second intervals, stirrinng in between, until gelatin dissolves. Pour Dissolved gelatin mixture into the mango puree mixture and mix until incorporated. Fold in cold whipped cream until blended. Pour the mousse immediately into a shallow dish, truffle dish, mold, or springform pan [whatever you intend to serve the mousse in] and chill until set, about 4-5 hours.

To prepare the mirror, soak the gelatin into half the water [so 1/4 cup]. Meanwhile, heat the rest of the sugar in the remaining water until sugar dissolves. Add the soaked gelatin to the sugar water and stir until dissolved [heat gently until dissolved if necessary]. Add the sugar/gelatin mixture to the mango puree and stir until fully incorporated. Let the mirror come to room temperature. Pour the mirror through a sieve on top of the chilled mousse. Allow mirror to set in the refrigerator, at least an hour, before serving.


It looks so creamy, and the color is beautiful. It sets extremely well too. Plus, I got to use some mango puree my mom whipped up from fresh mangoes over the summer [which she so generously gave me to stick in the freezer for such uses as this]. Once I can get my hands on some halal gelatin, I'll replicate it at home.

I was a bit worried about the mirror, but it also turned out absolutely perfectly. Definitely a good choice. I think I'll retry this in a smaller size and without the joconde lining around the cake in future. Maybe with a coconut spongecake base. Or chocolate. I've heard chocolate and mango is a rather daring combination...

Friday, January 28, 2011

salted caramel brownies

Caramel.

this is not caramel

I have very mixed feelings about caramel. On the one hand, it can be absolutely delicious. Warm, silky smooth, seeping into brownies and cakes and making them moist and scrumptious. On the other hand, the hardened, tough, chewy caramel found in cheap chocolates makes me want to puke is not so tasty. I've also had bad experiences making caramel in the past. Clumps up, hardens too much, becomes chunky, burns. It's a tough endeavor.

this is caramel

But I think I would have to put salted caramel at the top of my list of "things-I-would-pour-into-a-glass-and-take-shots-of." It's actually one of the most delicious things I've ever tasted. Actually. Ever. EVER. The contradiction of flavors, of sweet and salty, light and rich, is incredible on your tastebuds. Just makes you happy from the inside out.

It's been a tough couple of days lately, for a number of reasons. Seeing the end of a very long week approach, I knew I had to do something to lighten things up a bit. So I baked, of course. Salted caramel brownies. Warm, delicious, comforting, perfect.

Now, I used the same brownie recipe found in my cream cheese swirled brownies post. It has yet to fail me. In this one, though, I omitted the coffee (coffee AND caramel seemed a bit too much), and threw in some chopped walnuts. I will give you the amazingly delicious salted caramel recipe here though.


Salted Caramel Sauce
Adapted from Delishhh.

You'll need:
  • 1 cup granulated sugar
  • 1 tsp salt
  • 6 tbsp butter
  • 2/3 cup heavy cream

In a medium saucepan, heat sugar on medium heat until it begins to melt, whisking constantly, until sugar turns a bright amber color. This will take about 5 minutes. It's alright if it forms clumps. Whisk in salt. Toss in butter all at once and whisk until blended. Remove saucepan from heat and slowly pour in heavy cream, whisking constantly and vigorously. Whisk until the sauce is smooth. It's alright if there are a few, small clumps. Let caramel sauce cool for 10-15 minutes before using in brownies.

Meanwhile, preheat oven to 350 degrees and line and grease a 9x13-inch pan. Prepare brownie batter as directed. Pour half of the prepared brownie batter into the pan and spread evenly. Using a spoon, pour about 1/4 cup of salted caramel evenly over the brownie batter. Pour the remaining brownie batter on top. Pour another 1/4 cup of salted caramel evenly over the top of the brownies. Bake for 25-30 minutes, until set. Let cool completely before serving and cutting. Reheat remaining salted caramel for 10-15 seconds to warm up and pour over the cooled brownies before serving.


Caramel sauce stays good for up to one month covered at room temperature, three months refrigerated.

These were delicious. I actually ate an entire brownie, despite my relatively good attempts at low-carbing. And had rationality not hit me, I literally would have taken a ladle to the saucepan of caramel sauce. Not sure I would have regretted it, either. 

Half of these went to Ali as a belated birthday present, and the other half went to my dear friend Nayaab. I do hope both enjoyed them! 

You know, sometimes a little sugar is okay to pick you back up, I think.


Si sta
come d'autunno
sugli alberi
le foglie
-Giuseppe Ungaretti

(Feels like
those leaves
on branches
in autumn)

Thursday, January 27, 2011

{DBC} biscuit joconde imprimé/entrement

I can officially post! Literally, I've had this sitting in my pending posts since this past weekend.

No, I am not pathetic, I just like to write before I forget the recipes [read: too lazy to have to look them up].


My culinary life has taken quite a turn. I make that out to be much more dramatic than it actually is, but I am quite excited about it. I've finally joined one of the most revered blogrolls in culinary cyberspace. The Daring Bakers, to be precise.

Towards the end of December, I joined the Daring Bakers, one of two "chapters" of the Daring Kitchen blogroll (the other being the Daring Cooks). At the start of every month, the Daring Bakers reveals a Challenge Recipe that all members of the chapter are to bake and post on their own blogs on the 27th. This month, my first official month as a Daring Baker and my first month participating, the recipe challenge was for biscuit joconde imprimé, which I filled with a mango mousse entrement.

You know those gorgeous little, cylindrical layer cakes you see in pastry shop windows? The ones with decorative "wrappings" around them, designed with intricate patterns and colors? Filled to the brim with mousses, puddings, cheesecakes, Bavarian creams, and the like? Turns out, it's not an impossible feat. A difficult one, yes, but not impossible.


Biscuit joconde imprimé is a light, almond spongecake with a decorative design baked into it. The joconde batter is baked in thin sheets, and its flexibility allows the pâtissier to use it to line the outsides of Charlottes or mousses. [Incidentally, "La Joconde" is the French name of the Mona Lisa]. Entrement, a French term literally meaning "between servings", refers to a small dish served between courses, or more commonly, a dessert dish. As a dessert, entrements are layered cakes alternating numerous layers of spongecake or génoise and pastry cream. So, when put together, the joconde imprimé serves as the outer "wrapper" of the entrement filling. 

This recipe has a few components, but is also extremely flexible, insofar as what entrement you choose. There's the joconde paste [or pâte à cigarette, as I've seen it called as well], the joconde sponge, and the entrement [which in my case consisted of a mango mousse and a mango mirror]. I'm not going to lie, there were some...complications when I made this. Long story short, three hours, 20 eggs, two do-overs, and one still somewhat dissatisfied novice baker later, the joconde was done. Just the joconde. The mango mousse, made the day after with the help of my favorite sous baker, Tommy, took another few hours [though this includes chill time]. Overall, though, as unexpectedly time-consuming as this turned out, I'm glad it was the challenge recipe. I would never have learned how to replicate those gorgeous little cakes otherwise.

Not that I have the skill required to replicate those, by any stretch of the imagination, but it at least gives me some direction. And another opportunity to bake with friends. And for my mother to snicker at my culinary inadequacies. Everyone wins!


Biscuit Joconde Imprimé
Recipe adapted from the Daring Bakers' January 2011 Challenge Recipe

For the joconde paste, you'll need:
  • 1 stick [8 tbsp] unsalted butter, at room temperature
  • 1 cup confectioner's sugar
  • 4 egg whites
  • 3/4 cup plus 1 tbsp cake flour
  • food coloring as desired [for chocolate variation, add 1/3 cup cocoa powder in place of food coloring]
*as a note: I've adjusted the joconde paste recipe to halve the one given in the challenge post. This is because the ratios used in the given recipe yielded more than twice the amount of paste I needed, even after redoing the joconde imprimé.

For the joconde sponge, you'll need:
  • 3/4 cup almond meal [almond flour]
  • 1 cup confectioner's sugar
  • 1/2 cup cake flour
  • 3 eggs
  • 1 tsp almond extract 
  • 3 egg whites
  • 2 1/2 tsp granulated sugar
  • 2 tbsp butter, melted 

Line a 13x18-inch [I used an 11.5x17.5-inch] pan with a sheet of wax paper and set aside. Do not preheat the oven yet, as the following will be a somewhat lengthy process.

Begin by making the paste. Cream the butter and sugar until smooth and fluffy. Gradually add in egg whites, beating continuously. Fold in flour and cocoa, if using. If not using cocoa, fold in flour and tint the batter with a few drops of whatever food coloring desired. If not using joconde paste immediately, paste keeps well in an airtight container for up to three days. Otherwise, proceed with the decorating.

There are two ways to go about decorating the joconde sponge. 1) Spread the paste thinly over the wax paper, and use a knife, pastry comb, spatula, or your fingers to draw designs. Otherwise, 2) Use a piping bag to pipe designs all over the wax paper. [I transferred the paste into a ziplock bag and clipped a corner to use as a make shift piping bag]. In any case, once the design has been drawn on the wax paper, place the pan in the freezer until the paste hardens, at least 15-20 minutes. 

While joconde paste is hardening, begin preparing the joconde sponge batter. Preheat oven to 450 degrees Fahrenheit [if using a dark pan, reduce heat to 425]. In a clean, dry bowl, whisk egg whites on medium-high speed until they begin to get frothy [if using a stand mixer, be sure to use the whisk attachment]. Slowly add in the granulated sugar and continue whisking on high speed until stiff peaks form. Set aside. In another bowl, combine almond meal, confectioner's sugar, and cake flour. Add eggs, one at a time, blending until a smooth batter forms. Add in vanilla and mix until incorporated. Gently fold in 1/3 of the egg white mixture to lighten the batter, before folding in the remaining egg whites. Finally, fold in melted butter. Do not over-mix, or egg whites will deflate.  

Once joconde paste has hardened, remove pan from the freezer. Slowly pour the sponge batter over the paste, smoothing it evenly with a spatula. Bake for 6-7 minutes, until sponge is just beginning to brown. The sponge bakes extremely quickly, so be alert. Once baked, allow spongecake to cool for about 5 minutes before removing it from the pan. Invert the cake onto a sheet of wax paper so the decorated side is facing up. 

Now, prepare the mold. Decide what size you want your joconde to be. Typically, they're rather tiny, so mini springform pans would be ideal. Unfortunately, I didn't own any at the time [I have 4 coming in the mail soon!], so I went with an 8-inch springform. Line the walls of the mold with parchment paper [this will prevent the spongecake or filling to stick to the pan while it's chilling]. Once you've readied the mold, cut the cooled joconde sponge into strips to line the walls of the pan, against the parchment paper. Make sure the layers fit tight against the wall; you don't want them resting loosely or the entrement won't chill properly. If desired, cut out a piece large enough to fit into the base, or bake a separate sponge cake to use as layers. Set the prepared mold aside.


inside of my prepared mold
Now, decide on what to use as your entrement. I used a mango mousse and mirror, but any sort of cheesecake, mousse, Bavarian cream, or pudding would work, so long as there is enough gelatin or cornstarch to help it keep its shape. Once the entrement is done, pour it into the joconde, layering it as desired. [I just filled the entire joconde with mango mousse, though in future I would like to do alternating layers of spongecake and mousse.] Chill the joconde long enough for the entrement to set, usually 4-5 hours, and remove from the pan when ready to serve.


Hm. I didn't love the way mine turned out. The sponge cake was sloppy, and my technique was off since I wasn't quite sure what to expect. And my imprimé, despite having baked quite well, came out rather shoddy, since the mirror dripped down the sides of the spongecake walls before it was able to set, and consequently the walls stuck to the sides of the pan. 

:(
I was, however, pretty satisfied with how well the mango mousse and mirror held up. Tommy was a huge help there, and provided emotional support when I was positive this entire thing was going to fall apart at the seams. It also tasted quite good, according to him and Matt, which I suppose, in the long run, is all that matters.

Overall, not one of my best cakes, nor one that I'm super satisfied with, but once those mini springforms come in, I'm positive I will be attempting more of these. I'm feeling a chocolate espresso mousse cake next...


In other news, not quite sure why promises of snow keep failing us here in Cville. It's getting highly distressing. I mean, I just want to curl up with some coconut Oolong and my new mug and not have to go to class. Is that so much to ask?

Monday, January 17, 2011

gooey butter cake

New look, new dessert, new semester.

I've spent the last two weeks relishing Cville without students. Campus has been so quiet that walking across it to and from the apartment shuttle has been relaxing in and of itself. Then, coming home and bundling up in a hand-knit quilt, cooking and baking, watching Netflix, visiting friends, having friends visit... it's been lovely.

But, alas, all good things must come to an end, and a new semester starts in 2 days. I came home briefly this past weekend to exploit my mom's credit card on groceries and pick up Assassin's Creed to see my amazing family, which was nice after a 25-hour work week. Though, I must say, I do love my apartment dearly. And Noosh is back now, too, so it's home again. I'm even pretty excited about the upcoming semester, which is admittedly nerdy to the max, but I can't help it that I actually signed up for classes that I'm excited about. [History of Marx? Unsolved Mysteries of the Universe? Is it any wonder that I managed to find all of the philosophically-driven college requirements offered?]


Really though, I think it's the lack of Symbolic Logic alone that has me anticipating a good semester.

That, and I have a bunch of dessert recipes lined up to try.

Oh, and Spain in 5 months, but that's no big deal [read: I'm counting down the days desperately].

Today was Raj and Hershil's birthday. Twenty years old. Goodness. Everyone's turning twenty, and leaving me in the dust! But that's alright. [I just get to stay wrinkle-free for longer.]

For the occasion, I baked them some famous gooey butter cakes. These rich cakes, though, more like bars because it's impossible to eat an actual slice of this thing without dying of sugar overdose, originated in St. Louis in the 1930's. They started out as coffee cakes, rather than dessert cakes, but over time the yellow-cake-and-cream-cheese-topping variation turned it into a sugary-sweet, after-dinner treat.


Gooey Butter Cakes
Adapted from Paula Deen's The Ladies & Sons Just Desserts 

For the cake, you'll need:
  • 1 18.25-oz package yellow cake mix [i.e. one box]
  • 1 egg
  • 1 stick [8 tbsp] butter, melted

For the filling, you'll need:
  • 1 8-oz package cream cheese, softened
  • 2 eggs
  • 1 tsp vanilla
  • 1 stick butter, melted
  • 16-oz powdered sugar
  • 1 1/2 cups toffee bits, optional
  • 1 1/2 cups chocolate chips, optional
  • 1 cup chopped nuts, optional

Preheat oven to 350 degrees and grease a 13x9-inch baking pan.

To prepare the cake, combine cake mix, egg, and butter and mix well with an electric mixture. Pat the mixture evenly into the base of the pan. Set aside.

To prepare the filling, beat cream cheese until smooth. Add eggs, one at a time, and beat until incorporated. Add vanilla and butter and beat until blended. Turn mixer speed to low and slowly add powdered sugar until mixture is smooth. Toss in nuts, toffee, or chocolate [or any combination thereof] and stir into mixture, if desired. Pour the filling on top of the cake. Bake for 45-55 minutes, until filling has set, but is still slightly gooey [do not overbake]. Wait for cake to cool to room temperature before cutting into bars.


For this batch, I added some toffee bits, which is my standard adaptation of Paula's recipe [though sometimes I'll toss in half a cup of chopped pecans as well]. I don't know, I just like the crunch of the toffee, and the nuts help to offset the sweetness a little bit. I've never tried a chocolate variation of this, though, but I'm sure it would taste just as phenomenal.

The first time I ever baked these was a few years back, for a dear old friend who loved them. So much so that I'm pretty sure I baked these for him a number of times, and the repeated practice is how I initially got really into baking bar desserts. They're just so portable, and versatile, and make excellent gifts, and are delicious.

That, and Nitya referred to these as "applesauce bars," for reasons I'm not quite sure of, seeing as how there is absolutely no applesauce in them, nor do they taste at all like apple. Maybe it's the consistency? Except that it's not? -shrug- She always was an odd one...


Happy birthday, boys :)

Monday, January 10, 2011

luscious lemon bars

Jessica visited Cville yesterday! I haven't seen that girl in...half a year? More than that? Failed skype dates, busy schedules, being about 10 hours apart, yadda yadda yadda. So she decided to visit; came over in the evening, stayed the night, we grabbed some breakfast [i.e. 32 ounces of iced coffee] this morning, and then parted ways as I went to work and she went to visit other friends.

Not gonna lie, about 2 months ago she sent me a message asking if I could mail her some food after a tough week. And I said "Yes! Of course!"

...and then I got busy, promptly forgot, and ended up not doing it.

But after she told me that she was coming by, I knew this was my moment of redemption.


Luscious Lemon Bars
Adapted from The Cookie & Biscuit Bible

For the crust, you'll need:
  • 1 1/4 cups all-purpose flour
  • 7 tbsp unsalted butter, chilled and cut into cubes 
  • 1/2 cup confectioner's sugar

For the topping, you'll need:
  • 2 eggs
  • 1 cup granulated sugar
  • grated zest of one lemon
  • juice of one large lemon, about 1/3 cup [add bottled lemon juice as needed]
  • 1 tbsp all-purpose flour
  • 1/2 tsp baking soda
  • confectioner's sugar, for dusting 

Preheat oven to 350 degrees Fahrenheit. Line an 8x8-inch square cake pan with aluminum foil, and grease the bottom and sides.

To prepare crust, process flour, butter, and confectioner's sugar in a food processor or stand mixer on high speed until mixture firms into a dough. Add cold water, one tbsp at a time, if dough isn't coming together. Press dough evenly into the base of the tin and spread smoothly using the back of a spoon. Bake for 12-15 minutes until crust is lightly golden. Set aside and let cool.

To prepare topping, whisk eggs until frothy. Add sugar little by little, whisking in between additions. Whisk in lemon juice, zest, flour, and baking soda until mixture is smooth. Pour onto cooled crust. Bake for 20-25 minutes, until set and golden. Leave bars to cool completely before cutting. Refrigerating until serving. Sprinkle confectioner's sugar on top, right before serving.


I love lemon bars. I think everyone else on the planet does, too. The shortbread-like crust, the silky smooth, tart, bright yellow topping, the combination of both textures when you take a bite. What's not to love?

The particular cookbook I used for this recipe has about 4 other 'lemon bar' recipes, all unique. I want to try them all and figure out which are the best. When I initially made this following the book's ratios and took a test bite, though, I found the bars to be slightly too sweet and not tart enough [though, the lack of actual sugar for the past while may have contributed to the massive sugar rush that ensued]. Nevertheless, the ratios I've typed above are altered to how I would bake them in future.

...should have sprinkled some powdered sugar on top. curse my impatience.

Hmm. I really need some new serving plates. So I don't resort to white, paper plates for contrast. Plates that make everything else seem more orange than they actually are. Or maybe that's just my coffee table. Ugh. -overly dramatic sigh-


Photographic aesthetics aside, I hope these made up for my forgetfulness last semester, Jess!

Sunday, January 9, 2011

{low-carb} chocolate mocha cheesecake

A weekend spent in DC is quite a weekend indeed. I was at Chelsea's for the past few days, along with Matt. DC itself was tons of fun [Courage the Cowardly Dog marathons, Slug Wars, seeing Liz and Olivia, delicious food], but life itself has been a littttttle hectic these days. Car troubles, class scheduling, job and internship hunting, and study abroad planning have got me a bit stressed, to say the least.

Luckily, being in DC was not only good to calm down a bit, but stress therapy via baking with Chelsea was one of the best things I could have done this weekend. Specifically, low carb chocolate mocha cheesecake. The biggest downside about this was that I didn't have my DSLR with me, so photos are courtesy of my phone camera.


LC Chocolate Mocha Cheesecake
Recipe adapted from Your Lighter Side

For the crust, you'll need:
  • 1/2 cup crushed pecans
  • 1/2 cup crushed walnuts
  • 1/2 cup crushed almonds
  • 2 tbsp erythritol
  • 4 tbsp butter, melted

For the ganache layer, you'll need:
  • 2 oz Lindt 85% dark chocolate [approximately half the bar, or 4.5 squares]
  • 2 tbsp cocoa powder
  • 1 tbsp butter
  • 3 tbsp heavy cream
  • 1 tbsp erythritol

For the filling, you'll need:
  • 4 8-oz packages cream cheese, at room temperature
  • scant 1/2 cup erythritol
  • 3/4 cup xylitol or baking Splenda
  • 4 eggs
  • 1 tbsp vanilla extract
  • 1/2 cup sour cream
  • 3.5 oz Lindt 85% dark chocolate [standard bar size]
  • 4 tbsp cream
  • 2 tbsp butter
  • 1 tsp coffee extract
  • 2 tbsp brewed coffee

Preheat oven to 350 degrees Fahrenheit. Grease a 9-inch springform pan.

To prepare crust, combine crushed nuts in a bowl. Mix in erythritol. Pour melted butter over nuts and mix until incorporated. Pour nuts into the bottom of the springform pan and spread evenly. Set aside.

To prepare ganache layer, in a medium saucepan melt butter and chocolate. Once smooth, slowly pour in heavy cream and mix until there are no lumps yet. Sprinkle erythritol and cocoa powder over top and stir until smooth. Remove pan from heat and let chocolate cool, about 5 minutes. Once cooled, pour ganache on top of crust and spread evenly.

To prepare filling, beat cream cheese with erythritol and xylitol/Splenda on medium speed until fluffy. Add eggs, one at a time, and beat until incorporated. Add in sour cream and vanilla and beat until just combined. Meanwhile, in a separate saucepan, melt butter and chocolate. Slowly pour in heavy cream, coffee extract, and brewed coffee. Mix until smooth. Let cool, 3-4 minutes, before slowly pouring chocolate mixture into the cream cheese mixture, while beating on medium-low speed. Beat until chocolate is fully incorporated into the batter. Pour cheesecake filling into saucepan slowly, as not to disturb the ganache layer. Bake for 75-90 minutes. Let cheesecake cool to room temperature, then, while still in the springform pan, refrigerate for at least 4 hours before unhinging sides and serving.

Total carbs per slice [1/8 of cheesecake]: approximately 6 net carbs.


The original crust recipe calls for macadamia nuts,which we didn't have on hand. So we kind of arbitrarily picked a combination of nuts we felt would taste good. Really, it's up to you what kind of nuts you'd like for the crust, as long as the ratios stay the same. Also, I'm sure the crust would be just as delicious with real sugar in place of the artificial, if LC isn't your thing. Just pour whatever favorite cheesecake filling you want on top, and voila.

The ganache layer is totally optional in this cheesecake; Chelsea and I added it on a whim, more or less. Plus, it was adding hardly any more carbs to the overall cake. [And it was damn good]. Not to mention the dark little 'fudge' ribbon on top of the crust looked very pretty when the cake was cut.

The filling itself is exquisite. It hardly tastes low carb at all, since the artificial sugar leaves virtually no aftertaste. That was always the problem I had with low carb desserts; the absolutely terrible Splenda aftertaste. I think the answer is the erythritol, which is much milder on the palate than Splenda alone. Or maybe it's the combination of the two? Either way, this works. Another note on the filling: eliminating the chocolate addition [so, filling recipe minus heavy cream, butter, chocolate, and coffee] is the perfect low-carb, traditional cheesecake filling. I think Mrs. Sparta actually preferred the filling pre-mocha flavor.


I was afraid this dessert would fail in comparison to Mrs. Sparta's fantastic LC baking, but it was actually extremely delicious. To all of our surprises, I think. What's even better is that none of us missed the sugar.

I would take a slice of full-carb cheesecake over LC any day, mind you, but for the time being, this is more than acceptable.

Friday, January 7, 2011

toffee bars

There are a few things I want to do in my life.

Well, I mean, there are a lot of things I hope to do in my life.

But there are a few things I would kill to do. Travel the world, travel the world to eat, open a bakery, meet iron chef Michael Symon and Anthony Bourdain, have both of the aforementioned invite me over for dinner, have a dessert Throwdown with Bobby Flay, etc. etc. But you know what else I would love to do more than anything? Voice a Disney princess.

How epic would that be?!

unfortunately finished this before rapunzel became an official princess :( but she's here in spirit!

While driving home at 11 pm tonight, I was blasting and singing along to my Disney playlist. Mostly to keep me from falling asleep at the wheel, but also because any time is a good time for Disney music. Particularly the "Tangled" soundtrack. So addicting! Plus, Zachary Levi and Mandy Moore do a phenomenal job voice acting and singing.

Oh man, I would just love to do that. But as much as I love all things Disney, that is not what this post is about.


Toffee bars. Hershil came over to the apartment last night to help me bake before we went to see Black Swan [which is an incredible movie, by the way, but also the one most disturbing things I've seen]. It was quite fun, duking it out on the Wii while these were in the oven, chatting about anything and everything. Thank goodness he's taking J-term classes, because there are only so many reruns of Iron Chef I can watch before the ability to list their dishes within the first five minutes makes the entire hour of programming rather dull.

Now, I love this recipe. In fact, it was the first recipe I tried from The Cookie & Biscuit Bible, and compelled me try more immediately afterward. I've gifted these a few times in the past, because they're always a huge hit. Luckily, this time was no different.


These babies went to my good friend, DUSTIN HIGGINS, despite his poor taste in movies and rap music [Avatar and Lil Wayne, really?], as a promised, belated birthday gift. I spent the evening with him and Beth after I got off of work, which was a fantastic way to break up the monotony of my workweek. Especially after a fun evening with Hershil yesterday. Two for two, man, I'm on a roll.


Toffee Bars
Adapted from The Cookie & Biscuit Bible

You'll need:
  • 1 pound [4 sticks] of butter, softened to room temperature
  • 1 1/2 cups of brown sugar
  • 2 egg yolks
  • 1 1/2 tsp vanilla
  • 4 cups flour
  • pinch of salt
  • 1 1/2 cups semisweet chocolate chips
  • 1 cup chopped pecans or walnuts [this is optional, but highly suggested]

Preheat oven to 350 degrees Fahrenheit and grease and flour a 9x13-inch pan. Beat butter and sugar on medium speed until fluffy. Add in egg yolks and vanilla and beat until fully incorporated. Lower speed and slowly add flour and salt. But until just mixed. Pour batter into pan and spread and press down evenly with the back of a spatula. Bake for 25-30 minutes, until top is golden-brown.

As soon as shortbread is out of the oven, sprinkle chocolate chips evenly over top. Wait 2-3 minutes for chocolate to begin melting, and then use a knife to spread chocolate evenly across the top of the shortbread. Sprinkle chopped nuts on top of the chocolate. Let cool at least 30 minutes before cutting.

Bars keep well in an airtight container for up to a week.


I seriously love these things. They're not overly sweet, sort of melt in your mouth, and the nut crunch on top is delightful. Plus, Dustin, Beth, and Hershil loved 'em, so I was pretty satisfied.


I actually didn't eat any from this batch, which was both extremely depressing and extremely difficult. I'm working on low-carbing it for a few weeks, just to kind of clean the refined flour and sugar out of my system [after the past few...months...of gastronomic frivolity]. But boy, did they smell good when they came out of the oven.

Ugh. I'm one more omelette away from just buying a baguette and eating it whole.

No.

I will persevere. 

...maybe.


Let's just say, it's a good thing that there are none of these left in the apartment...

Tuesday, January 4, 2011

top 10 of 2010

No, not recipes. Cookbooks, actually! I felt prompted to do this after I got an email asking me which cookbooks I would recommend. At the time, I wasn't at my apartment, so I didn't have any of them on hand. But now that I'm back, and have little to do but watch the Food Network when I get home from work, I figure I'd share my ten favorite cookbooks with all of you!  

10. Cupcakes by Pamela Clark
Truth be told, the only reason this is number 10 is because I haven't tried any cupcakes from this book. Yet. And I could have picked one of the other 19 cookbooks that aren't on this list that I actually have used before, but I plan on trying this one out this year. Hopefully multiple times. [especially her fig and toffee crowns and her banana caramel cakes]  

9. Junior's Cheesecake Cookbook by Alan Rosen & Beth Allen
These cheesecakes are just divine. In the past, I've made the fresh strawberry cheesecake with macaroon crunch, the pumpkin swirl cheesecake, and the brownie swirl cheesecake, and eventually want to try their white chocolate and raspberry swirl, tiramisu, and devil's food cheesecakes. Interestingly, many of their cheesecakes use a sponge cake crust in place of the traditional graham cracker crust, which gives the entire cake a whole new flavor. Though, all the fillings adapt easily to the traditional crust if, you prefer it that way. 

8. Baking, From My Home To Yours by Dorie Greenspan
This cookbook weighs about as much as an Organic Chemistry textbook. Dense, heavy, and full of standard baking recipes from scones and coffee cakes to poached pear and pistachio tarts. I've made tons of desserts out of this book, but some of the better ones would include her Tribute-to-Katherine Hepburn brownies and all-American, all-Delicious Apple Pie. It's a fantastic baking guide for beginners, because Dorie gives a lot of great basic recipes, but also has some very impressive ones for more experienced chefs. [do you like my effort at sounding legit?] 

7. Wok & Stir-Fry, part of the Cook's Library series
Chinese food! Really, really good, and really, really easy to make Chinese food. Much healthier than take-out [which I don't really like at all], and absolutely delicious. The book is broken down by type of cuisine: soups & appetizers, poultry & meat, fish & seafood, vegetables, vegan & vegetarian, and rice & noodles. There's definitely something for everyone in this book. Their spicy shrimp soup, by the way, is my favorite soup of all time. 

6. The Lady & Sons Just Desserts by Paula H. Deen
You know a cookbook by Paula Deen is going to be good. By association, you know that a dessert book by Paula Deen will be incredible. And full of butter. Which this is. This is also full of really easy recipes. Many of her cakes use boxed cake mixes as a base, so there's little in the way of 'from-scratch' baking, other than throwing a couple of pounds of butter, cream cheese, or a can of sweetened condensed milk into the batter. I love her gooey butter cake recipe, which I've altered to my own tastes about six times, and her 1-2-3-4 cake recipe continues to be my favorite basic cake recipe.  

5. The Cookie and Biscuit Bible by Catherine Atkinson [recipes by Joanna Farrow & Valerie Barrett]
This was a birthday gift to me from Nitya a few years ago. It is the best cookbook I've ever used for cookie and bar recipes. Each one I've tried out of this book has been a flying success [is that an expression? I feel like it is, but at the same time I'm pretty sure it's not...]. I'm actually going to bake something from it later this week [stay tuned!], and have made the marbled caramel chocolate slices [i.e. millionaire's shortbread], biscotti, pecan nut squares, and chocolate cheesecake brownies. Great, now I'm salivating.

4. The New Indian Cooking Course by Manisha Kanami & Shehzad Husain
Now, Indian [and Pakistani] food is my favorite type of food. Shocker. But I was always afraid that I'd never be able to duplicate the recipes that my mom makes or dishes I've had at Indian restaurants. This book comes pretty damn close. I've only made a handful of Indian dishes so far [all of them with chicken], but I'm hoping to try a few more soon. Especially some of the vegetarian ones.

3. Sticky, Chewy, Messy, Gooey by Jill O'Connor
First of all, this looks like a preteen girl's chick lit. Seriously. It is the most colorful, lacy, polka dotted, pink cookbook I've ever seen. And I love it. Not to mention that each recipe is about as disturbingly sweet as its appearance. But you'll love it too. The best chocolate cake I've ever made is her chocolate caramel-pecan souffle cake. It is the epitome of chocolate decadence. Oh my gosh. Her gooey caramel butter bars are also phenomenal. Even if you're not planning on buying this, or have no desire to bake anything for the rest of your life, do yourself a favor and rent it from the library. I promise it'll make you happy.

2. The Unofficial Harry Potter Cookbook by Dinah Bucholz
This was my most used cookbook towards the end of the year. Big surprise! Actually, I was surprised at how well the recipes turned out. You've seen 'em before already, but the pumpkin pasties and peanut butter bon bons are magical [pun intended]. I've also tried the herb-roasted chicken, and it just cast a spell on my taste buds [oh stop, you're killing me]. Hermione's cherry bakewell cake also sounds scrumptious. The only thing it lacks is Butterbeer. But never fret, dear Muggles, for after visiting Hogsmeade and tasting Butterbeer first hand, I vow to come up with a comparable recipe. I'd bet my wand on it [facepalm].

1. Alice's Tea Cup by Haley Fox & Lauren Fox
Yes, my favorite cookbook of 2010 was Alice's Tea Cup's newly released cookbook. It helps that I still have a massive fancrush on the owners [who - did I mention? - signed my copy!] after visiting Nimra in NYC back in October. Honestly though, if you're ever in the city, you have to check their restaurant out. It's one of the cutest places I've ever been, and the food is amazing. Thus far I've only baked their pumpkin scones, which were melt-in-your mouth DELICIOUS, but I've sampled their lemon strawberry scones and their Curious French Toast [which, Nimra, I still need to send you]. Their sandwiches also look incredible, and I'm dying to try the curried chicken sandwiches and Alice's Croque Madam. Go to NYC, eat at Alice's Tea Cup, buy the cookbook. Best life choice you will ever make.


So there you go! My ten favorite cookbooks of 2010. I do want to mention, though, that as the year went on, I began turning to blogs a lot more than actual cookbooks. Tastespotting.com, aside from being my favorite distraction during boring lecture-I mean, my bedtime ogle, is phenomenal for recipes. Just type in whatever you're searching for [as general or as specific as you want] into the search bar, and you'll find dozens of mouth-watering photos to choose from.

Ahhh, another enormous rant. Sorry that there haven't been any baked goods yet! But I will be baking, hopefully tomorrow, so don't worry! There will be lots more pictures and recipes coming, and a lot less me typing whatever nonsense comes to mind. :)

Now, please excuse me while I re-stack these cookbooks on top of my fridge and watch it promptly cave in...

Sunday, January 2, 2011

year in review: 2010

Wow, 2011 already?! I was pretty sure 2010 started only a week ago...

And yes, I am aware that 2011 started yesterday, but I was too busy to write. And forgot.

Mostly forgot.

Anyway, thinking back, it's been a really fulfilling year. I'm not going to reminisce about the non-food related aspects of my year or anything, but I did want to take a glance back at some of my favorite recipes of 2010.


It's been a good year for food.

Then again, every year is a good year for food.

But I really learned a lot this year. Baking, cooking, eating, appreciating. And, surprisingly, the journey was not only exciting, but emotional.

It's like...so much changes in one year, but through it all you've got to have something to turn to that will always be there. Something that won't throw you for a loop, or flake, or change for the worse. Something that you know has got your back through it all, at your happiest times and at your saddest times.

For me, that something happens to be my Kitchen Aid.

[you thought it would be something more sentimental, didn't you?]

In all honesty, though, it [it being baking in general, not specified to the aforementioned appliance alone] was something for me to turn to when I was overwhelmed or stressed and just needed to stop thinking for a while. It was also something for me to bond with friends over. And it was something for me to make other people feel happy with. I can associate so many emotions and experiences with baking, and I'm so glad to have had the opportunity to share some of those with all of you who read.

So, thank you to all of my readers, for understanding, and appreciating, and enjoying food with me. As an amazing friend told me recently, through the words of Laurie Colwin,

"One of the delights of life is eating with friends, second to that is talking about eating. And, for an unsurpassed double whammy, there is talking about eating while you are eating with friends."

Alright, alright, enough of the cheese fest. Now, I don't do much in the way of food resolutions. I've tried in the past: I resolve to give up junk food, I resolve to give up meat, I resolve to give up soda [although, that one I kept, mainly because the thought of drinking something constructed in a lab weirds me out o_O], etc. etc. And you know what I think? It's stupid to make a resolution about food. Why? Because I think that if you want to eat something, you should eat it. What's the point of having food if you can't enjoy it? 

At least, that's what I tell myself to lessen the guilt-trip after I've eaten a quarter of a pie.

Here's to hoping that 2011 will be another successful year of baking, cooking, and eating! 
Happy new year, everyone, and bon appetit. :)