
No, I am not pathetic, I just like to write before I forget the recipes [read: too lazy to have to look them up].

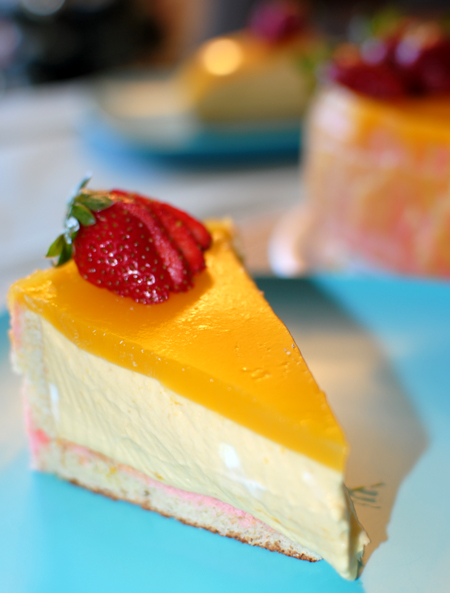
Towards the end of December, I joined the Daring Bakers, one of two "chapters" of the Daring Kitchen blogroll (the other being the Daring Cooks). At the start of every month, the Daring Bakers reveals a Challenge Recipe that all members of the chapter are to bake and post on their own blogs on the 27th. This month, my first official month as a Daring Baker and my first month participating, the recipe challenge was for biscuit joconde imprimé, which I filled with a mango mousse entrement.
You know those gorgeous little, cylindrical layer cakes you see in pastry shop windows? The ones with decorative "wrappings" around them, designed with intricate patterns and colors? Filled to the brim with mousses, puddings, cheesecakes, Bavarian creams, and the like? Turns out, it's not an impossible feat. A difficult one, yes, but not impossible.

Biscuit joconde imprimé is a light, almond spongecake with a decorative design baked into it. The joconde batter is baked in thin sheets, and its flexibility allows the pâtissier to use it to line the outsides of Charlottes or mousses. [Incidentally, "La Joconde" is the French name of the Mona Lisa]. Entrement, a French term literally meaning "between servings", refers to a small dish served between courses, or more commonly, a dessert dish. As a dessert, entrements are layered cakes alternating numerous layers of spongecake or génoise and pastry cream. So, when put together, the joconde imprimé serves as the outer "wrapper" of the entrement filling.
This recipe has a few components, but is also extremely flexible, insofar as what entrement you choose. There's the joconde paste [or pâte à cigarette, as I've seen it called as well], the joconde sponge, and the entrement [which in my case consisted of a mango mousse and a mango mirror]. I'm not going to lie, there were some...complications when I made this. Long story short, three hours, 20 eggs, two do-overs, and one still somewhat dissatisfied novice baker later, the joconde was done. Just the joconde. The mango mousse, made the day after with the help of my favorite sous baker, Tommy, took another few hours [though this includes chill time]. Overall, though, as unexpectedly time-consuming as this turned out, I'm glad it was the challenge recipe. I would never have learned how to replicate those gorgeous little cakes otherwise.
Not that I have the skill required to replicate those, by any stretch of the imagination, but it at least gives me some direction. And another opportunity to bake with friends. And for my mother to snicker at my culinary inadequacies. Everyone wins!

Biscuit Joconde Imprimé
Recipe adapted from the Daring Bakers' January 2011 Challenge Recipe
For the joconde paste, you'll need:
For the joconde sponge, you'll need:
Line a 13x18-inch [I used an 11.5x17.5-inch] pan with a sheet of wax paper and set aside. Do not preheat the oven yet, as the following will be a somewhat lengthy process.
Begin by making the paste. Cream the butter and sugar until smooth and fluffy. Gradually add in egg whites, beating continuously. Fold in flour and cocoa, if using. If not using cocoa, fold in flour and tint the batter with a few drops of whatever food coloring desired. If not using joconde paste immediately, paste keeps well in an airtight container for up to three days. Otherwise, proceed with the decorating.
There are two ways to go about decorating the joconde sponge. 1) Spread the paste thinly over the wax paper, and use a knife, pastry comb, spatula, or your fingers to draw designs. Otherwise, 2) Use a piping bag to pipe designs all over the wax paper. [I transferred the paste into a ziplock bag and clipped a corner to use as a make shift piping bag]. In any case, once the design has been drawn on the wax paper, place the pan in the freezer until the paste hardens, at least 15-20 minutes.
While joconde paste is hardening, begin preparing the joconde sponge batter. Preheat oven to 450 degrees Fahrenheit [if using a dark pan, reduce heat to 425]. In a clean, dry bowl, whisk egg whites on medium-high speed until they begin to get frothy [if using a stand mixer, be sure to use the whisk attachment]. Slowly add in the granulated sugar and continue whisking on high speed until stiff peaks form. Set aside. In another bowl, combine almond meal, confectioner's sugar, and cake flour. Add eggs, one at a time, blending until a smooth batter forms. Add in vanilla and mix until incorporated. Gently fold in 1/3 of the egg white mixture to lighten the batter, before folding in the remaining egg whites. Finally, fold in melted butter. Do not over-mix, or egg whites will deflate.
Once joconde paste has hardened, remove pan from the freezer. Slowly pour the sponge batter over the paste, smoothing it evenly with a spatula. Bake for 6-7 minutes, until sponge is just beginning to brown. The sponge bakes extremely quickly, so be alert. Once baked, allow spongecake to cool for about 5 minutes before removing it from the pan. Invert the cake onto a sheet of wax paper so the decorated side is facing up.
Now, prepare the mold. Decide what size you want your joconde to be. Typically, they're rather tiny, so mini springform pans would be ideal. Unfortunately, I didn't own any at the time [I have 4 coming in the mail soon!], so I went with an 8-inch springform. Line the walls of the mold with parchment paper [this will prevent the spongecake or filling to stick to the pan while it's chilling]. Once you've readied the mold, cut the cooled joconde sponge into strips to line the walls of the pan, against the parchment paper. Make sure the layers fit tight against the wall; you don't want them resting loosely or the entrement won't chill properly. If desired, cut out a piece large enough to fit into the base, or bake a separate sponge cake to use as layers. Set the prepared mold aside.
Now, decide on what to use as your entrement. I used a mango mousse and mirror, but any sort of cheesecake, mousse, Bavarian cream, or pudding would work, so long as there is enough gelatin or cornstarch to help it keep its shape. Once the entrement is done, pour it into the joconde, layering it as desired. [I just filled the entire joconde with mango mousse, though in future I would like to do alternating layers of spongecake and mousse.] Chill the joconde long enough for the entrement to set, usually 4-5 hours, and remove from the pan when ready to serve.
Recipe adapted from the Daring Bakers' January 2011 Challenge Recipe
For the joconde paste, you'll need:
- 1 stick [8 tbsp] unsalted butter, at room temperature
- 1 cup confectioner's sugar
- 4 egg whites
- 3/4 cup plus 1 tbsp cake flour
- food coloring as desired [for chocolate variation, add 1/3 cup cocoa powder in place of food coloring]
For the joconde sponge, you'll need:
- 3/4 cup almond meal [almond flour]
- 1 cup confectioner's sugar
- 1/2 cup cake flour
- 3 eggs
- 1 tsp almond extract
- 3 egg whites
- 2 1/2 tsp granulated sugar
- 2 tbsp butter, melted
Line a 13x18-inch [I used an 11.5x17.5-inch] pan with a sheet of wax paper and set aside. Do not preheat the oven yet, as the following will be a somewhat lengthy process.
Begin by making the paste. Cream the butter and sugar until smooth and fluffy. Gradually add in egg whites, beating continuously. Fold in flour and cocoa, if using. If not using cocoa, fold in flour and tint the batter with a few drops of whatever food coloring desired. If not using joconde paste immediately, paste keeps well in an airtight container for up to three days. Otherwise, proceed with the decorating.
There are two ways to go about decorating the joconde sponge. 1) Spread the paste thinly over the wax paper, and use a knife, pastry comb, spatula, or your fingers to draw designs. Otherwise, 2) Use a piping bag to pipe designs all over the wax paper. [I transferred the paste into a ziplock bag and clipped a corner to use as a make shift piping bag]. In any case, once the design has been drawn on the wax paper, place the pan in the freezer until the paste hardens, at least 15-20 minutes.
While joconde paste is hardening, begin preparing the joconde sponge batter. Preheat oven to 450 degrees Fahrenheit [if using a dark pan, reduce heat to 425]. In a clean, dry bowl, whisk egg whites on medium-high speed until they begin to get frothy [if using a stand mixer, be sure to use the whisk attachment]. Slowly add in the granulated sugar and continue whisking on high speed until stiff peaks form. Set aside. In another bowl, combine almond meal, confectioner's sugar, and cake flour. Add eggs, one at a time, blending until a smooth batter forms. Add in vanilla and mix until incorporated. Gently fold in 1/3 of the egg white mixture to lighten the batter, before folding in the remaining egg whites. Finally, fold in melted butter. Do not over-mix, or egg whites will deflate.
Once joconde paste has hardened, remove pan from the freezer. Slowly pour the sponge batter over the paste, smoothing it evenly with a spatula. Bake for 6-7 minutes, until sponge is just beginning to brown. The sponge bakes extremely quickly, so be alert. Once baked, allow spongecake to cool for about 5 minutes before removing it from the pan. Invert the cake onto a sheet of wax paper so the decorated side is facing up.
Now, prepare the mold. Decide what size you want your joconde to be. Typically, they're rather tiny, so mini springform pans would be ideal. Unfortunately, I didn't own any at the time [I have 4 coming in the mail soon!], so I went with an 8-inch springform. Line the walls of the mold with parchment paper [this will prevent the spongecake or filling to stick to the pan while it's chilling]. Once you've readied the mold, cut the cooled joconde sponge into strips to line the walls of the pan, against the parchment paper. Make sure the layers fit tight against the wall; you don't want them resting loosely or the entrement won't chill properly. If desired, cut out a piece large enough to fit into the base, or bake a separate sponge cake to use as layers. Set the prepared mold aside.
 |
| inside of my prepared mold |
Hm. I didn't love the way mine turned out. The sponge cake was sloppy, and my technique was off since I wasn't quite sure what to expect. And my imprimé, despite having baked quite well, came out rather shoddy, since the mirror dripped down the sides of the spongecake walls before it was able to set, and consequently the walls stuck to the sides of the pan.
 |
| :( |
Overall, not one of my best cakes, nor one that I'm super satisfied with, but once those mini springforms come in, I'm positive I will be attempting more of these. I'm feeling a chocolate espresso mousse cake next...

In other news, not quite sure why promises of snow keep failing us here in Cville. It's getting highly distressing. I mean, I just want to curl up with some coconut Oolong and my new mug and not have to go to class. Is that so much to ask?
Looks really awesome.You have to make it once you get home!What is that pink stuff at the base though?
ReplyDeleteYour cake looks delicious...and so exotic!
ReplyDeleteWelcome to the Db community and congrats on a first challenge done very well indeed. Your entremt looks lovely and mango is my fave fruit!
ReplyDeleteYour cake looks awesome! I love mangoes and I can't wait for the mango season to start~!
ReplyDeleteHello, just wanted to mention, I enjoyed this article. It was inspiring.
ReplyDeleteKeep on posting!
Have a look at my blog Max Robust REviews
yeezy boost 350
ReplyDeletecheap oakley sunglasses
kobe sneakers
adidas yeezy boost
ray ban uk,cheap ray ban sunglasses
air jordan shoes
kobe shoes
nike huarache
oakley vault
kobe basketball shoes
michael kors outlet online
ray ban sunglasses outlet
tiffany online
tiffany and co jewellery
louboutin shoes
michael kors handbags,michael kors handbags clearance,michael kors clearance
http://www.chromehearts.com.co
adidas stan smith uk
michael kors handbags
jordan retro
cheap jordan shoes
cheap uggs
true religion jeans wholesale
adidas tubular x
fitflops sale
cheap basketball shoes
michael kors handbags clearance
discount oakley sunglasses
kobe shoes
chrome hearts
kobe basketball shoes
find cheap designer bags replica site web Dolabuy Valentino go to my blog https://www.dolabuy.ru
ReplyDeleteread what he said Hermes Dolabuy click this site Dolabuy Celine right here https://www.dolabuy.su
ReplyDeleteCool and that i have a swell offer: What House Renovations Can You Claim On Tax house renovation vancouver
ReplyDelete