Monday, November 29, 2010

classic chocolate chip cookies

Okay, okay; I know I said I'd put the baking on hold after Thanksgiving. But these weren't for fun! Promise!

Besides, I won't be baking for a while after this. [Until Saturday. And then next Saturday. But that's besides the point.]

I baked these yesterday for the two kids that Chelsea and I have been tutoring this semester. Elizabeth and Andres. They are two of the sweetest children I've ever met. I actually tutored Elizabeth last fall as well, and was really excited to get to see her again this year. I also remember baking these for her last year, so it was only appropriate that I do the same now. And she seemed to enjoy them, so I was pleased.

Now, I'm not a huge cookie person. I'm more of a brownie/pie/cake type. But I love a good, homemade cookie [store-bought cookies are the worst]. And this happens to be a recipe that I swear by. And I'm sure you guys all have it at home, too, and just never realized it.

Or, at least you would if you had a 7-pound bag of Nestle semisweet chocolate chips stored in your pantry like I do. -cough-

Yes, folks. Nestle Toll House's original, classic chocolate chip cookie. Easy as peas [is this the right expression?] and tastes delicious.


Classic Chocolate Chip Cookies

You'll need:

  • 2 1/4 cups all-purpose flour
  • 1 tsp baking powder
  • 1 tsp salt
  • 1 cup [2 sticks] butter, softened
  • 3/4 cup granulated sugar
  • 3/4 cup brown sugar
  • 1 tsp vanilla
  • 2 eggs
  • 1 1/2 cups semisweet chocolate chips
  • 1 cup chopped nuts [walnuts are best for cookies], optional

Preheat oven to 375 degrees Fahrenheit and line a baking sheet with parchment paper. Combine flour, baking powder, in salt in a medium bowl. Beat butter, granulated sugar, brown sugar, and vanilla in the bowl of an electric mixer [fitted with the paddle attachment] until creamy.  Add eggs, one at a time, scraping down sides of the bowl with a rubber spatula as necessary. Slowly add in flour mixture and mix until just combined. Add in chocolate chips and nuts, if using, and mix until dough is uniform.

Drop dough by the tablespoon onto the parchment paper, about 1.5-inches apart. Bake for 9-12 minutes [less time for gooier cookies and more time for crisper cookies], until tops are golden brown. Cool cookies on a wire rack. Serve immediately, or store in an airtight container at room temperature. Cookies store well for up to 4 days.


Oh man. Cookies and milk. What a stellar combination. I want to meet whomever it was that came up with it and give them a big ol' hug. Furrulz.

Also, I love this recipe because it's so adaptable. For this particular batch, I only used chocolate chips [nuts are a bit sophisticated for kids, I think], but in the past I've used walnuts, peanut butter morsels, toffee bits, white chocolate chips, what have you, alongside the traditional semisweet chocolate.

And with milk, while the cookies are hot off the cooling rack? Oh dear, heaven.

Thursday, November 25, 2010

ultimate pumpkin pie

You thought it was over, didn't you? I did too. Not so.

Yusra spent all day hinting [read: loudly voicing] that she was craving pumpkin pie. "What's Thanksgiving without pumpkin pie?!" "I haven't had pumpkin pie in years." "Can you please bake one?!"

...

Being the ever-so loving sister that I am, I obliged. Also, I figured we may as well, since we'd have the house to ourselves for the evening. So we ran out to pick up some necessary ingredients that I didn't have on hand, were spontaneously joined by Mustafa and Murtaza, and we [read: I] got to work.


Ultimate Pumpkin Pie

For the filling, you'll need:

  • 1 8-oz package of cream cheese, at room temperature
  • 1 15-oz can pumpkin [NOT pumpkin pie filling]
  • 1 cup sugar
  • 1/2 tsp salt
  • 1 tbsp vanilla
  • 1 cup half and half
  • 1/4 cup [1/2 stick] butter, melted
  • 1 egg plus 2 egg yolks, slightly whisked
  • 2 tsp cinnamon
  • 1 tsp ground ginger
  • 1 unbaked pie crust
  • whipped cream or vanilla ice cream, to serve

For the crust, use any premade pastry dough [NOT pre-baked] or your own favorite pie crust recipe. I actually used the one that I wrote in my previous entry, with the pecan pie. Whichever you end up using, prick holes in the bottom and sides of the pie crust. Bake at 350 degrees Fahrenheit for 15 minutes, and let cool for 10 minutes before using with the pumpkin filling.

To make filling, beat cream cheese on medium speed in the bowl of an electric mixer fitted with the paddle attachment until smooth. Add in pumpkin and beat until well-mixed, scraping down the sides of the bowl with a rubber spatula as needed. Add in sugar, vanilla, and salt and beat until fully incorporated. Pour in half and half, eggs with yolks, and butter and blend. Finally, add cinnamon and ginger. Pour filling into the cooled pie crust and bake at 350 degrees until filling has set, about 50-60 minutes.

Let pie cool for at least 30 minutes before cutting and serving. Serve with whipped cream or vanilla ice cream, if desired.

Yusra could not sit still while this was baking. I had no idea she has such an epic sweet tooth.

This pie filling recipe actually comes from Paula Deen, so I knew it would be pretty good. Understatement. It's the best pumpkin pie I've ever had. Though, I suppose that's not saying too much, because I'm not a huge fan of pumpkin pie [don't get me wrong, I don't dislike it, I just don't care much for it].

It's probably the fat from the cream cheese and half and half that make this taste so good. But it's alright. It's Thanksgiving. Indulge!

Oh boy, I am all baked out. Can you believe it?

Mom's probably thrilled.

As for now, I'm ready for a long, deep sleep. After a movie or two, of course.

giving thanks and pecan pie

Thanksgiving.

Oh man. What a classy holiday. I don't even know where to begin.

Would it be too much to admit that I've been waiting for this day for the past 3 weeks?


I've had a menu planned out for a while now and have been cooking since yesterday afternoon. Come to think of it, there actually wasn't a ton of food: good ol' roast turkey, garlic herb roast potatoes, cheddar buttermilk biscuits, cornbread stuffing, and pecan pie with homemade whipped cream. We had more food last year, but then again, I wasn't the one cooking last year, and we had twice as many people over.

The rents and the rest of my extended family are going to a huge party this evening, so we didn't have a party here at home this year. But mom really, really wanted to eat turkey for lunch, so we had an early Thanksgiving dinner late this afternoon. Which I was fine with.


Last night, I set the turkey out to brine in a simple ice-cold mixture of vegetable stock, salt, brown sugar, allspice berries, and peppercorns. I also made 
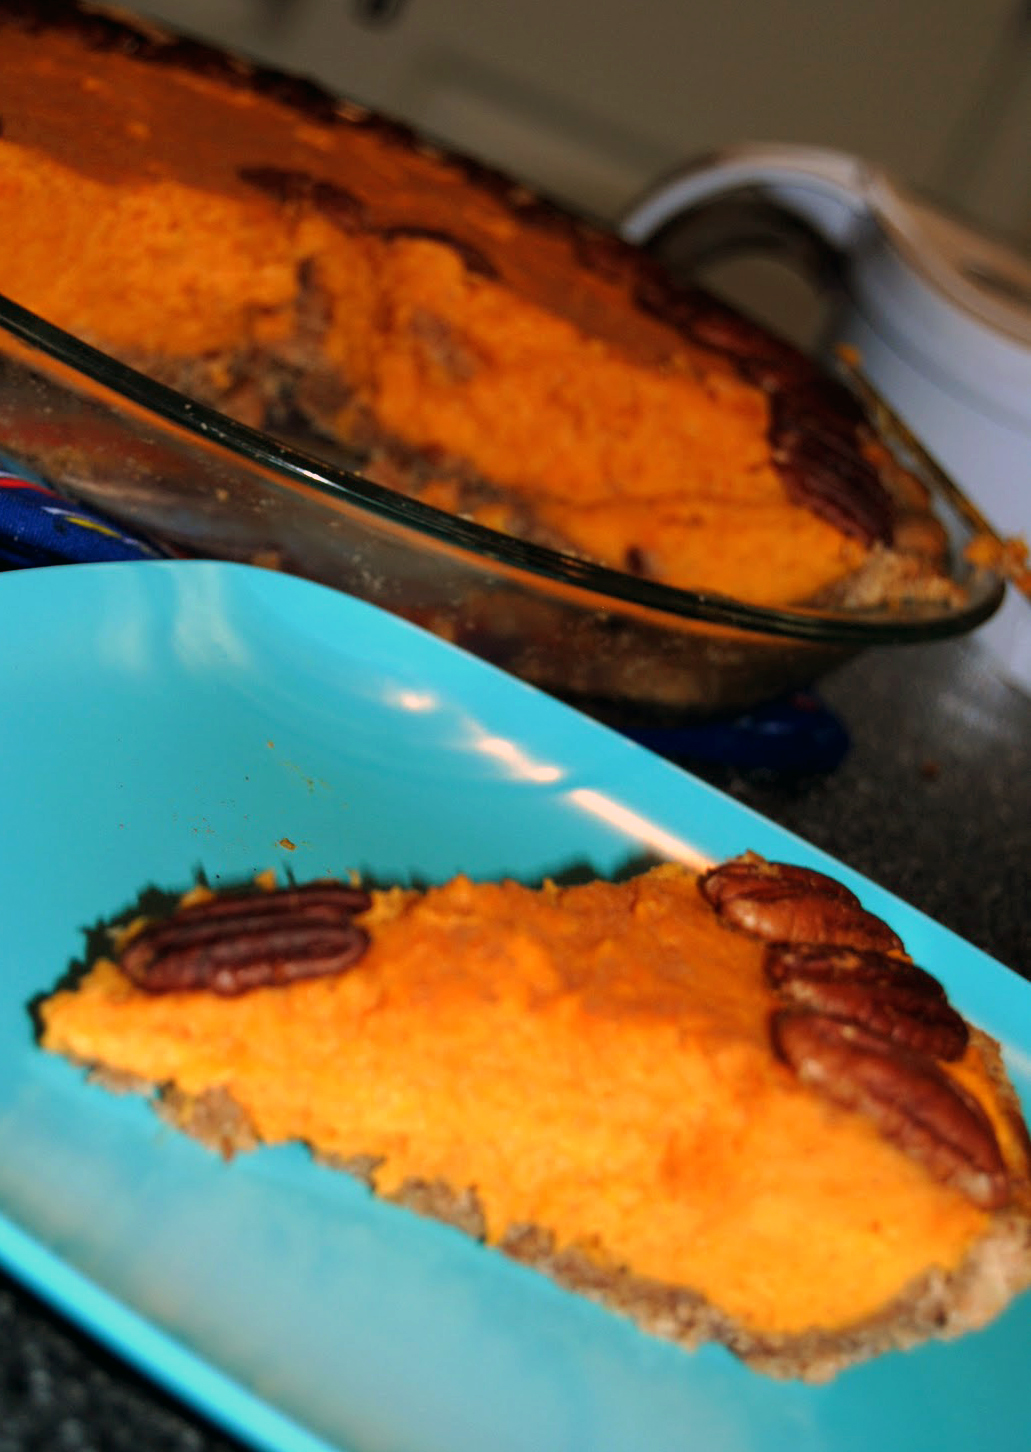
pecan pie, which turned out to be the best one I've made so far [we tried a butterscotch pecan pie last year, which was not a crowd favorite, and a chocolate pecan pie in the past, which is too unconventional for my liking]. So, I'll be giving you the recipe for that, should you wish to try it out!


Pumpkin Pie

For the crust, you'll need:
  • 1 1/2 cups all-purpose flour
  • 1 tbsp sugar
  • 1/2 tsp salt
  • 9 tbsp cold unsalted butter, cut into small cubes
  • 4 tbsp [or more, as needed] of cold water

For the filling, you'll need:
  • 3/4 stick unsalted butter
  • 1 1/4 cups light brown sugar
  • 2 tsp vanilla
  • 1/4 tsp freshly grated orange zest 
  • 1/4 tsp salt
  • 3/4 cup agave nectar
  • 3 eggs
  • 2 cups pecan halves

For the whipped cream, you'll need:
  • 1 cup heavy cream
  • 1 tbsp sugar
  • 1 tsp vanilla
 
To make crust: blend flour, sugar, and salt in a food processor or stand mixer fitted with the paddle attachment. Add in butter and pulse on medium speed until dough has the consistency of breadcrumbs. Slowly drizzle cold water over the mixture until dough starts to come together. Add more water if needed. Gather dough into a ball, cover with plastic wrap, and chill for at least one hour in the fridge.

To make filling: in a saucepan over medium-high heat, melt butter. Add in brown sugar and whisk until smooth. Remove from heat and add in orange zest, salt, vanilla, and agave, whisking until well blended and there are no lumps.

To assemble pie: preheat oven to 350 degrees Fahrenheit and grease a 9-inch pie plate. Roll out the pie crust dough until about 12-inches in diameter. Drape crust over the pan and press it down gently. Fold the overhanging dough under and gently press it to the rim of the pie plate. Crimp the edges of the dough and prick the bottom and sides lightly with a fork. Scatter the pecan halves evenly over the bottom of the dough. Gently pour the filling on top of the pecans. Place pie plate on a baking sheet and bake until the filling is set, 50-60 minutes. Let cool for at least one hour before slicing and serving.

To make whipped cream: use an immersion hand blender or electric mixer with whisk attachment on high speed to beat heavy cream until soft peaks begin to form. Add in sugar and vanilla and whisk until stiff peaks form. If not serving immediately, refrigerate whipped cream. Before serving, blend lightly once again to stiffen the cream.


I made the pie last night, refrigerated it overnight, and left it out at room temperature during the day as everything else was cooking. It kept perfectly well, and taunted us for hours before we actually got to eat it. In terms of the rest of the meal, it turned out wonderfully. I won't type out the recipes, because that would take ages, but I'll give you a rough recap:

The aromatics I used for the turkey were handfuls of fresh sage, rosemary, and thyme bunched up in a cheesecloth with one red onion, one head of garlic, and one lemon, all quartered. I brushed the outside and underneath the skin of the turkey with one stick of melted butter mixed with a small handful of thyme flakes, a tablespoon of lemon juice, and some cracked pepper. Did not use any salt at all due to the brine. The 14-pound turkey roasted for 2 hours and 45 minutes at 350 degrees. Potatoes were roasted with olive oil, dried rosemary flakes, minced garlic, and cracked sea salt. Cheddar buttermilk biscuits were made like any old buttermilk biscuits would be, with a cup of freshly grated cheddar cheese thrown into the dough. Cornbread stuffing was baked with half a loaf of cornbread, half a pack of saltines, 4 slices of toasted white bread, 2 cups of celery and an onion sauteed in a stick of butter, 3 cups of chicken broth, and 4 sage leaves.


I was also going to sautee some green beans in olive oil with minced garlic, but we ran short of time. And, honestly, I'm not sure if I would have been able to eat them alongside everything else.

Actually, originally it was just going to be mom, Yusra, and me who would be eating the Thanksgiving feast. But Mustafa called 30 minutes before the turkey was done and asked if I needed any help in the kitchen, so we invited him and Murtaza over to eat with us. Everyone loved the food, especially the turkey [I recall Yusra telling me a little while later that I have to make this exact same turkey for every Thanksgiving from here on out], and I was extremely happy about it. All those of hours of cooking paid off!

And thank god they came to eat, too, or we'd have so much leftover turkey on our hands we wouldn't know what to do with it.


Well, that's a total lie. I plan on taking some of it back to Cville with me when I head home on Sunday, and mom is dying to make a turkey pot pie sometime this weekend before I leave. Plus, since I'm skipping tonight's party [if I weren't still so full, I would be all over the thought of eating a tandoori turkey tonight], I'll probably end up nibbling on some of the leftovers when I get hungry. [Though, in all likelihood, I'll probably just make a beeline to the leftover pecan pie].


In all seriousness, though, I love this holiday. I think it's such an amazing time of year to be getting together with family and enjoying the changing leaves and comfort foods. You feel so warm and cozy, you don't stress yourself out with thoughts of finals and papers [or at least, I'm not, which I know will kick my butt in a few days], and you get to spend time at home, sleeping in, drinking freshly pressed apple juice, and wondering about in PJs all day. It's perfect, really.

Plus, there's so much that I'm thankful for. Family that loves and supports me, even though they think my philosophy degree will leave me unemployed indefinitely; friends that are amazing to be around and encourage my obsessive baking habits; the opportunity to attend a great university; living in a comfortable apartment with the best apartment-mate I could hope for. Not to mention good food. Man, am I thankful for good food. 

I hope you have an amazing Thanksgiving full of comforting food, good company, and joy. After all, it's the beginning of an excellent holiday season.

left: before dinner; right: after dinner

In other news, I have decided that there is no way I am stepping foot outside to go shopping tomorrow. Which is odd, seeing as I'm pretty sure I woke up at 4 am last year and shopped for about 8 hours.

It's funny how living on your own, working 10 hours a week, and having the 'rents stop funding you changes your perspective on personal finances.

Happy Thanksgiving, everyone!

Tuesday, November 23, 2010

classic chocolate eclairs

I love when friends want to bake. It's such a fun time, getting together with people, making messes, laughing at kitchen disasters, and taste-testing dessert. And I'm sure the fact that they get delicious food out of it has nothing to do with wanting to spend time with me. Nope, not at all.

Tonight, my boys [i.e. Raj, Hersh, Nathaniel] came over to bake eclairs. This whole bake date was actually all Hershil's idea, though he and I both compromised on the dessert of choice. Mainly because I've never made choux pastry before and thought it was about time to try, but also because Hershil had no idea what an eclair was.

OM. NOM.

Classic Chocolate Eclairs

For the choux pastry, you'll need:
  • 1 cup water
  • 1 stick butter
  • 2 tsp sugar
  • 1/2 tsp salt
  • 1 cup flour
  • 4 eggs

For the pastry cream, you'll need:
  • 2 cups whole milk
  • 1/2 cup sugar
  • 1 tsp vanilla
  • 6 egg yolks
  • 4 tbsp flour
  • 4 tbsp butter

For the chocolate glaze, you'll need:
  • 4 tbsp butter
  • 4 oz chocolate

To make filling: in a medium size saucepan over medium flame, heat milk. In a separate bowl, whisk egg yolks, sugar, vanilla, and flour. When the milk is steaming, pour about 3/4 cup of hot milk into the egg mixture, whisking constantly. [This is done to temper the egg yolks so they do not cook once added to the milk.] Once combined, pour the egg mixture back into the saucepan. Continue whisking. Once milk mixture comes to a boil, whisk for about 2 minutes and then remove from heat. Add in butter and whisk until well blended. The filling should have thickened. Let filling cool to room temperature before pouring into a bowl. Cover bowl with plastic wrap and refrigerate for at least one hour. [Note: pastry filling can be made up to 2 days in advance if kept in the fridge in an airtight container.]

To make choux pastry: preheat oven to 425 degrees Fahrenheit and line a baking sheet with parchment paper. In a medium saucepan over medium flame, heat water. Add the butter, sugar, and salt, and stir with a wooden spoon until butter has melted. Add flour all at once, and stir vigorously. The mixture will immediately start to thicken and pull away from the sides of the pan. Once blended, remove saucepan from heat and let cool for 4-5 minutes, stirring occasionally. Add eggs, one at a time until each is fully incorporated into the pastry dough, stirring vigorously. Spoon pastry dough into a piping bag or plastic bag with a medium-sized hole cut in the corner [or a No. 10 or larger tip for the piping bag]. Pipe pastry dough in 1x4-inch strips, with about an inch space in between. Bake for 20-25 minutes, until tops are golden brown. Let cool to room temperature before filling.

To fill eclairs, cut through the pastry with a knife, along the middle [but do not cut pastries in half]. Spoon filling into a piping bag or plastic bag and pipe a generous amount of filling into each eclair.

To prepare chocolate glaze: in a microwave or over a stove-top, melt chocolate and butter. Let cool for 1-2 minutes before drizzling over filled eclairs. Serve immediately or refrigerate. Eclairs will keep well in the fridge for up 2-3 days.


So, I picked the boys up around 7. We swung by Kroger and picked up some milk and eggs, then headed over to the apartment. I didn't initially realize that eclairs would be as long a process as they are [the filling in particular], so we made the filling and played some Catch Phrase while it was chilling. We won't even go into how embarrassing of a game that was [long story short, I for the life of me could not remember the word for 'termite', though Nathaniel and I ended up winning. Twice. Even when he thought that a body part with the word 'blade' was 'nose' instead of 'shoulder'], but it passed the time well as the pastry cream was setting.

Then we made the choux pastry. Oh man, what an adventure. Basically, it didn't occur to me to let the dough cool before adding the eggs, and I added them immediately after removing the scalding hot dough from the heat. [Never mind the fact that I remembered the need to temper the eggs before adding them to the pastry cream.] Needless to say, my poor little eggs scrambled.

Initially, Raj and Nathaniel suggested that we could salvage the situation. Not so. Scrambled eggs + pastry dough = tastes like pastry dough with scrambled eggs. So we ended up having to throw out the dough completely and restarting from scratch with the choux pastry. But, hey, baking is always an experiment. Plus, I taught Nathaniel how to separate egg whites from yolks while Raj skimmed through some of my cookbooks and Hershil ordered us some Chinese take-out.
what we demolished while the choux pastry was baking
But the choux turned out perfectly the second time around, and after another round of Catch Phrase and chitchat, we filled the eclairs and covered them in chocolate.


Oh man. These were good. I was pleasantly surprised; choux pastry is pretty difficult, and I'm not a huge fan of most pastry creams, so I wasn't expecting these to be as tasty as they were. The boys helped me fill and glaze them, and I recall leaving them to finish up while I washed dishes. And when I caught up with them, half the plate was already demolished.

But hey, at least they liked 'em!

I sent all but three home with them to share with their dorm, because the last thing I need is to be munching on eclairs during the dead of night before the last day of class.

Though I'm thinking that after Thanksgiving feast [which is back on, by the way (YES!), as I was told by mom earlier today], I'll give the baking a bit of a break. I mean, this hobby is getting both expensive and bad for my health. For rulz.

But that also means that I get to experiment with more cooking! Six pounds of chicken breasts frozen in the freezer, here I come!


In other news, there are 6 egg whites in a bowl in my fridge right now.

Guess I'm going to be eating one epic omelette for breakfast tomorrow morning.

Sunday, November 21, 2010

pumpkin cheesecake brownie fusion

The "fusion" bit comes from Noosh. She insisted they weren't "brownie" enough to be called such.

Tommy came over earlier today for a bake date, our first one since the pumpkin macarons back in October. I had decided on this recipe a while ago, and was really excited to be baking with him [because, come on, he's pretty much the best dessert sous chef ever].

These were actually made for my dear friend Olivia, who turns 19 tomorrow. Of course, we did try some for ourselves, to make sure all our hard work had paid off. And also because I cannot resist anything made out of cream cheese.

left: brownie base; right: pumpkin cheesecake topping

Pumpkin Cheesecake Brownies

For the brownie base, you'll need:

  • 4 oz chocolate
  • 1 1/2 sticks butter
  • 2 cups sugar
  • 1 tsp vanilla
  • 3 eggs
  • 1 cup flour

For the pumpkin cheesecake topping, you'll need:
  • 2 8-oz packages cream cheese, room temperature
  • 1/2 cup heavy cream
  • 1 cup sugar
  • 3 eggs
  • 1 tsp vanilla
  • 1 14-oz can pumpkin [NOT pumpkin pie filling]
  • 1 tsp grated ginger [or 1/2 tsp powdered ginger]
  • 2 tsp cinnamon
  • 1/4 tsp nutmeg

Preheat oven to 350 degrees Fahrenheit. Grease and line a 9x13-inch pan with parchment paper or aluminum foil.

For brownie base: melt butter and chocolate in a microwave or stovetop. While chocolate mixture is cooling, beat sugar, eggs, and vanilla in an electric mixer on medium speed until well-mixed. Slowly pour in chocolate mixture and mix until blended. Slowly fold in flour. Spread brownie batter evenly on the bottom of the 9x13-inch pan. Set aside while preparing cheesecake topping.

For pumpkin cheesecake topping: beat cream cheese in the bowl of an electric mixer with the paddle attachment on medium speed until light and fluffy, 3-5 minutes. Slowly pour in heavy cream and beat until incorporated. Add in sugar and beat until smooth. Add in eggs, one at a time, beating until well incorporated. Add in vanilla and beat until smooth. Measure out 3/4 cup of cheesecake topping and set aside to use for swirling. In remaining cheesecake topping, add in pumpkin, ginger, and spices and mix until well-blended. Pour pumpkin cheesecake topping on top of brownie base and spread evenly. Use a spoon to dollop the leftover cheesecake topping over the pumpkin cheesecake layer. With a knife, swirl the white cheesecake topping. Bake for 60 minutes. Let pan cool completely, and then refrigerate for at least 4 hours before cutting and serving.


These were much less brownie-like and much more souffle-like when I cut them. I was pretty surprised. But they are absolutely delicious. Noosh and Tommy both approved. Hopefully Olivia will as well!

I did toss in about 1/4 cup of chocolate chips into the brownie batter after it was done. I always like a chocolate chip brownie, personally. I actually wasn't sure how the pumpkin and chocolate would taste together [it didn't seem like a very compatible pair to me before], but it was really good. I guess the sentiment is similar to chocolate chip banana bread [which, by the way, is divine].

Mom is both highly amused and frustrated with my recent baking binge. But I mean, there are only 2 class days until break, so there's not much else I could be doing with my time at the moment. Right?

the only thing i want on black friday is a better lens.

Speaking of break, I heard some terrible news earlier this evening: Thanksgiving dinner will not be happening this year. :( Believe me when I say that I am devastated.

Well, not devastated. But pretty sad. I mean, my entire menu, all planned out, for naught! There's just a lot going on at home at the moment, and we recently found out there will be more people over than originally anticipated, so we're just going to be going out instead. And the turkey mom had bought for my use will be saved for sometime during winter break.

Though, I can't say I'm too disappointed at the thought of having a Thanksgiving meal later in the year. It'll be a pleasant surprise. And my original menu can wait till then!

Besides, I'm not one to pass up a dinner at Texas de Brazil. Ever.

Saturday, November 20, 2010

kheer

I love South Asian and Middle Eastern desserts. Like, LOVE. I can't even express.

Imagine the most amazing dessert you've ever eaten in your life, multiply it by a thousand, and that's almost how delicious Pakistani and Indian desserts are. Almost.

I, personally, am no expert in making such desserts. They're super time-consuming, often very easy to destroy, and very difficult to find authentic recipes outside the realm of family. But earlier this week, on Eid, I decided I had to try one. Not being home, I don't really have access to good recipes, and I don't trust Indian cookbooks for reliable dessert recipes, so I spent the week pestering my mom, via email, to jot down her amazing kheer recipe for me. Which she did, and which I was extremely excited to try.


Now, kheer is a very traditional Pak-Indian dessert made by boiling rice or broken wheat with milk and sugar, and flavored with an array of possibilities [cardamom, saffron, pistachios, almonds, to name a few]. Sounds simple, yes?

Not so.

This is a very delicate recipe, and one that requires your constant attention. For over an hour.
Believe me when I say that I pulled up a chair, plopped down next to the stove with my laptop and PSP, and kept myself entertained for 75 minutes while stirring the kheer. But it was well-worth the effort, because it turned out almost as well as mom's.


Kheer

You'll need:

  • 1/2 cup basmati rice
  • 1/2 gallon whole milk
  • 3/4 cup granulated sugar
  • 3 pods of cardamom, cracked, or a generous pinch of ground cardamom
  • 1 drop of kewra or rose water [the two are not the same, and both cannot be used]
  • 1/4 cup raisins, if desired
  • ground almonds and pistachios, to garnish, if desired

Soak rice in warm water for 30 minutes. Meanwhile, In a large pot, heat the milk on medium-high heat until warm. Drain the water, and puree the rice with about 1/4 cup of the milk in a blender. Add the pureed rice to the warm milk and increase heat as to allow the milk to come to a boil, stirring constantly to prevent rice from forming clumps. Continue stirring until milk boils, and immediately reduce heat so milk does not overflow. Allow milk to simmer for an hour, stirring every 5 minutes. Once milk has begun to thicken, add sugar. Continue stirring on and off for 5 minutes. Taste for sweetness and add more sugar if desired. Toss in cardamom and kewra or rose water, and stir until blended. Toss in raisins, if desired, and stir. Turn off heat.

To serve, use a ladle to pour kheer into bowls. Sprinkle ground almonds and pistachios on top, if desired. Kheer can be eaten either hot or cold, and keeps well in the fridge for up to 5 days.


So in my kheer, I used essence of kewra instead of rose water, though both can be found in any international market. Kewra is an extremely fragrant species of shrub with flowers that is widespread in southern Asia and is used as a perfume, aromatic oil, or fragrant distillation. Essence of kewra is also very common in many South Asian desserts. Just one drop gives the dessert an explosion of flavor. I can't imagine kheer without it, though, so it's a must-have for me. I can't describe the fragrance at all; it's unlike anything I've ever smelled, but believe me when I say that it's irreplaceable.

Luckily, the international market here in Cville sells it, as well as rose water, so now my spice cabinet is fully equipped to suit all of my Fobby needs. In fact, it may be time for a bit more kheer soon...

In other news, Thanksgiving is less than a week away and I cannot WAIT. I've got my menu totally planned out, and it's going to be epic. Mustafa, Murtaza, and Ali will be joining us, as always, so it has to impress. Not to mention Yusra will be helping me out in the kitchen, so it's going to be a ton of fun.

Mom's probably praying that our house won't burn to the ground. I'm still deciding whether or not this is a legitimate fear.

sweet potato pie

Aw man. Sweet potato pie. Quintessential autumn treat.

Okay, I'll be honest for a second: I had never eaten a sweet potato until today. Well, I had some sweet potato french fries at Boylan sometime last year, but since that one moment, sweet potato in any form has not touched my lips [plus, Chelsea and Rudhdi told me that the fry incident counts for nil anyway]. So yes. Never have had a sweet potato in my life, until today.

chelsea & roods peeling some scalding hot sweet potatoes
And you know what? It was damn good.

After Farmers Market-ing earlier this morning for sweet potatoes with Rudhdi [not to mention splitting an incredible grilled root vegetable naan sandwich], I picked Chelsea up and brought the two of them to the apartment for a cute little autumn baking date. Roods and I had decided a while back that we wanted to try a sweet potato pie at some point, and this weekend, the weekend before Thanksgiving and midway through fall, was perfect.

Plus, I love baking with friends. Especially two who are as big of foodies as I am. LOVE.


Sweet Potato Pie

For the crust, you'll need:
  • 1 cup whole wheat flour
  • 1/2 cup almond meal [almond flour]
  • 1/4 cup crushed pecans [I like to use a hammer, myself]
  • 1 tsp salt
  • 1 stick butter, cold and cut into cubes
  • 3 tbsp cold water

For the pie filling, you'll need:
  • 1.5 pounds of sweet potatoes [about 3 medium-sized potatoes]
  • 1/2 cup sugar
  • 1 tsp cinnamon
  • 1/4 tsp nutmeg
  • 2 large eggs, lightly beaten
  • 1/4 cup sweetened condensed milk
  • 1/2 tsp vanilla
  • 1 tbsp butter, melted
  • pecan halves, for garnish

Preheat oven to 375 degrees Fahrenheit and grease a 9-inch pie pan.

For crust: in the bowl of an electric mixer fitted with the paddle attachment, blend wheat flour, almond meal, crushed pecans, and salt on low speed until well mixed. Toss in butter and increase speed to medium. Beat until dough has the consistency of breadcrumbs. Add in water slowly, until dough starts to come together. Press dough into the bottom and sides of a greased, 9-inch pie pan. Using a fork, poke holes into the bottom and sides of the crust. Refrigerate while preparing the filling.

For filling: boil or microwave potatoes until soft. Peel potatoes and cut into small cubes. In a medium-sized bowl, mash potatoes with a potato masher or fork. Add in sugar, cinnamon, and nutmeg, and continue mashing. Once mashed, add in eggs, condensed milk, and vanilla. Blend well. Finally add in melted butter and blend. Pour filling into pie shell. Lace the sides of the pie with pecan halves. Bake for 20-25 minutes, until filling has set and crust is golden. Let cool for at least 10 minutes before slicing.


It turned out pretty well.

Or at least the cries of "SOOO GOOOOOOOOOD" coming from Chelsea and Roods when they tried it would suggest so. I liked it a lot myself. Especially the nutty crust. I'm becoming a huge fan of using a combination of wheat flour and almond meal in place of white flour in crust recipes. The pecans in the crust and on top were a fantastic touch, too.

The only thing I would change about this recipe in future is maybe adding a bit more sweetened condensed milk. Though, truthfully, I eye-balled it, so it very well may have been less than the recipe called for. In any case, I was pleased.

Roods took some home for tomorrow, Chelsea took some home for Liz, and I rationed off a slice for Charlie, my wonderful SR from last year, as a peace-offering for stealing Roods away from today's Quidditch tournament. And Noosh and I have got about a quarter of it left. Excellent.

 
In other news, Deathly Hallows Part 1 was amazing. The epicness completely made up for the total lack of sleep Noosh and I got on Friday morning. Seriously. I plan on watching it again. Soon. The pumpkin pasties held up pretty well, too. And there was definitely a lot of emotional eating of the Bonbons during the movie. Glad I planned ahead on that one.

Not to mention this Dark Mark is STILL on my arm [sometimes I forget the magic (pun intended) of henna], for all my dorkiness out in the open for the world to see. Which is okay by me.

I may even retrace it before it fades completely. Maybe.

Wednesday, November 17, 2010

pumpkin pasties, straight off the hogwarts express

Oh yes. Authentic Pumpkin Pasties, straight from the Wizarding World.

[Oh how I wish that were the case...]


Bet you never knew that pumpkin pasties look like turnovers, did you?
[me neither]

Made these for tomorrow night's premier, along with the Peanut Butter Bonbons. Noosh and I split one of the midget ones, and oh my, they are good.

a thanks to noosh for playing paparazzi for me!

Pumpkin Pasties

For the dough, you'll need:

  • 1 1/2 cups all-purpose flour
  • 1 tbsp granulated sugar
  • 1/4 tsp salt
  • 8 tbsp cold butter, cut into pieces
  • 4 tbsp cold water

For the filling, you'll need:
  • 1 cup canned pumpkin [NOT pumpkin pie filling]
  • 1/4 cup granulated sugar
  • 1/8 tsp ground nutmeg
  • 1/2 tsp ground cinnamon
  • 4 oz cream cheese, room temperature

To make dough: on low speed, combine flour, sugar, and salt in the bowl of an electric mixer fitted with the paddle attachment. Cut in butter or add butter and beat on low-medium speed until dough has the consistency of breadcrumbs. Pour in water slowly until dough comes together. Add more water if necessary [though it shouldn't be]. Roll dough into a thick disc, cover with plastic wrap, and refrigerate for at least one hour.

For filling: on low-medium speed, beat pumpkin, sugar, nutmeg, and cinnamon until well blended. Add in cream cheese, increase speed to medium, and beat until smooth. Refrigerate until ready to bake.

Preheat oven to 400 degrees Fahrenheit. Roll dough out to 1/8-inch thickness and cut circles about 5-inches in diameter. [Note: recipe will make 6-7 pastries.] Put a little under a tablespoon of filling near the center of the circle, fold dough in half and pinch down the sides. Use a fork and make grooves to tighten the edges. Using a knife, make a small slit in the top of the dough. Bake for 30 minutes, or until pastry is golden-brown on top.


These were much tastier than I thought they'd be. I altered the original pumpkin filling recipe by adding some cream cheese [what can I say? I love me some cream cheese], and I may have overstuffed them a bit, but hey, more to love.

Though I do wish I had brushed the tops of them with an egg or butter wash so they would have glistened a bit. But in any case, they turned out to be quite a success.


It's taking every ounce of restraint not to eat one, but alas, I will save them for tomorrow. There will be just enough for Noosh, Yusra, Murtaza, Mustafa and I. Perfect.

Oh, not to mention the 28 or so Bonbons that are firming up in the fridge.


I look at these and just imagine that plump little witch on the Hogwarts Express, "Anything off the trolley dears?"

Oh man. My level of obsession is unnerving. But I'm fully okay with it.

Besides, I'm still waiting for my letter to Hogwarts.

peanut butter bulgarian bonbons

The 'Bulgarian' bit comes from Noosh. A la Goblet of Fire, of course.

I don't think I even need to talk about how Deathly Hallows Part 1 is released tomorrow night. But I will anyway.

DEATHLY HALLOWS PART 1 IS RELEASED TOMORROW NIGHT.
I CANNOT EVEN CONTAIN MY EXCITEMENT.

i'll show you mine if you show me yours

Obviously I had to celebrate in the form of edible treats. And since I so conveniently own a Harry Potter cookbook, I got straight to baking when I got home from classes this evening.

Peanut Butter [Bulgarian] Bonbons. Pretty much Buckeye Balls, but there's a hint of magic in these that you won't find in ordinary Buckeye Balls.

They were in the Harry Potter cookbook, after all.


Peanut Butter Bonbons

You'll need:
  • 1 1/2 cups smooth peanut butter
  • 1 1/2 cups confectioner's sugar
  • 1 tsp vanilla
  • 1 cup crushed graham crackers 
  • 10 oz bittersweet chocolate, melted

In a mixing bowl with paddle attachment, beat peanut butter, confectioner's sugar, and vanilla on medium speed until creamy. Pour in crushed graham crackers and mix until well combined. Line a flat surface with parchment paper. Using your hands, roll small balls of dough, about 3/4 to 1-inch in diameter, and place them on the parchment paper. Dough should form about 30 balls. Dip each of the peanut butter balls in the melted chocolate. Let the chocolate settle completely before eating. Refrigerate.


Aw man, these things are so cute. And so tasty. So much peanut butter. They are a little sticky, to be honest. And hard to keep together. But it all looks the same when you eat it, right? Right.

I'll be taking these and some pumpkin pastries to the midnight premier tomorrow. Noosh and I will be meeting up with my cousins and Yusra, as we've done for the past 6 movies.

Oh yes. Driving about 90 miles to the theater close to my parents' house, just to watch this movie.

I am that obsessed with this franchise. To be fair though, it did pretty much define my childhood. This and Pokemon, but that's besides the point.

noosh giving me a hand with the bonbons [pun intended]

Oh man. 12 hours and 35 minutes until the premier. I don't know if I'll be able to sleep tonight.

Nooooot exaggerating.

Saturday, November 13, 2010

blueberry sour cream torte

I love tortes. LOVE them. I've had some sour cream sitting in the fridge, and I wanted to put it to good use. So when I went home last weekend, I exploited my mother's credit card to purchase frozen blueberries [hey, frozen fruit is expensive!] to make this torte.

I figured today was as good as any to go ahead and bake it; it's been one of those super lazy Saturdays, staying in [aside from my Farmer's Market run with Rudhdi this morning and getting caught up in game-day traffic], napping [or failing to do so], feeling like crap [something's going around campus these days, ugh].

Okay, so mainly I wanted to bake something to lift my spirits a bit. But hey, it worked.

Plus, it was a lovely way to end our dinner of chicken jalfrezi earlier.


Now, tortes are dense cakes made with ground nuts in place of the majority of flour used. They're fantastic because they lower the glycemic index of usually very high-GI desserts [ignore the cups of sugar that go into them...], but also because they have very nutty, crispy, rich crusts.

And everyone knows crust is the best part of any dessert.

Though, when said dessert has a filling made of 4 cups of blueberries and a creamy, tart, topping made of sour cream, it's a pretty close call.

Blueberry Sour Cream Torte
Recipe adapted from Dana Treat

For the crust, you'll need:

  • 1 cup whole wheat flour
  • 1/2 cup almond meal
  • 2/3 cup ground almonds
  • 1/2 cup sugar
  • 1 1/2 tsp baking powder
  • 1/2 tsp salt
  • 1 stick butter, somewhat softened, but not warm

For the blueberry filling, you'll need:
  • 4 cups fresh blueberries [or thawed if frozen]
  • 1/2 cup sugar
  • 1 tsp lemon juice
  • zest of one lemon
  • 1/2 tsp ground cinnamon
  • 1/4 cup cornstarch

For the sour cream topping, you'll need:
  • 2 cups sour cream
  • 2 egg yolks
  • 1/2 cup sugar
  • 1 tsp vanilla

Preheat oven to 400 degrees Fahrenheit. Grease a 9-inch springform pan and line the bottom with parchment paper.

For crust: combine flour, almond meal, ground almonds, sugar, baking powder, and salt in the bowl of an electric mixer with the paddle attachment on medium-low speed. Add in butter and increase speed to medium. Combine until dough becomes crumbly and starts to come together. Pour crust into the prepared pan and press evenly over the bottom. Bake for 10-15 minutes, until crust is golden. Remove from oven and let cool. Reduce oven temperature to 350 degrees as the rest of the torte is assembled.

For filling: in a medium saucepan, combine all filling ingredients. Cook over a medium flame for 3-5 minutes, stirring gently, until blueberries start to bubble and burst. Reduce heat to low and simmer for 3 minutes. Set aside to cool slightly.

For topping: In a medium bowl, combine all topping ingredients. Mix until well blended.


Pour filling on top of crust and spread evenly. Pour topping on top of filling and smooth gently with a rubber spatula, without mixing the topping into the filling itself. Bake torte for 45 minutes. Set torte on a wire rack and let cool completely before unsnapping the sides and removing the torte from the pan. Refrigerate until ready to serve.

To be completely honest, I was terrified that this was going to fall apart. I thought the cornstarch wouldn't effectively hold the blueberries together and there would be some fruit spillage of epic proportions.

Not so. It helps that I waited a good two hours while the torte cooled in the fridge before I removed it from the pan and cut it. And it was well worth the wait, because the layers were perfect! The topping didn't even sink into the blueberry layer!

When Noosh and I each took a bite of the torte, we had mixed feelings. It didn't taste quite like I expected it to. I was anticipating some major blueberry flavor. Don't get me wrong, there is a TON of blueberry in it, but the topping really shines through, in a very good way. Plus, the crust is phenomenal.


Oh, mom would be proud. Or irritated.

Seeing as when I told her about the torte, all she texted me was that I'm "focusing more on my culinary skills than on studies." Which is not true!

...and even if it was [which it isn't], cooking is a much better life skill than symbolic logic will ever be.

Ever.

Thursday, November 11, 2010

homemade oreos with peanut butter filling

I woke up earlier than I needed to this morning. Of course, I tried going back to sleep, but it didn't work. It rarely does for me anyway. So then I figured there were two things I could do:

1) Get on Facebook and waste the extra 40 minutes of morning time I had stalking/creeping on people I don't really care about at all [nor vice-versa].
2) Bake.

I decided to go with the latter. Also as a kind of test to see if I could actually successfully bake something and not miss the bus to grounds.


Bam. AND I DIDN'T MISS THE BUS.
It was quite the successful morning.

Homemade Oreos with peanut butter filling. I baked these for my dear friend Zach, who celebrated his 20th birthday this past Tuesday. Earlier tonight one of his good friends threw him a surprise party, and since he'll be out of town all weekend on some silly XC shenanigans, I figured I'd whip these together to give him today. Though Noosh did sandwich them for me while I was in class, which was a tremendous help.

Since he's a big fan of the chocolate and peanut butter combination [and I mean, come on, who isn't?], I decided to go with the Oreo. [I also recall many a late-night calc II study session in which we devoured (read: emotional eating) packs of Oreos, so it had to be done.]


Homemade Oreos with Peanut Butter Filling

For the Oreos, you'll need:
  • 1 1/4 cups flour
  • 1/2 cup unsweetened Dutch process cocoa
  • 1 tsp baking soda
  • 1/4 tsp baking powder
  • 1/4 tsp salt
  • 1 1/4 cups granulated sugar
  • 1 1/4 sticks unsalted butter, at room temperature
  • 1 egg

For the filling, you'll need:
  • 1 cup confectioner's sugar
  • 1 cup smooth peanut butter
  • 5 tbsp butter, at room temperature
  • 1 tsp vanilla
  • 1/4 tsp salt
  • 1/3 cup whole milk

Preheat oven to 375 degrees Fahrenheit. Line a baking sheet with parchment paper.

In the bowl of an electric mixer, use the paddle attachment on low speed to combine flour, cocoa, baking powder, baking soda, salt, and sugar. Still on low speed, add in butter and eggs. Continue mixing until dough comes together in a mass.

Using your hands, roll up small balls of dough, about 1-inch in diameter, and place them about 2 inches apart on the baking sheet. With the palm of your hand, evenly press down on the dough to form discs. Bake for 11 minutes. Allow cookies to cool on a wire rack.

To make the filling, combine powdered sugar, peanut butter, salt, vanilla, and butter in the bowl of an electric mixer using the paddle attachment. Mix at low speed until creamy. Slowly pour in milk. Increase speed to medium-high and beat until mixture is smooth.

Once cookies have cooled completely, frost the flat side [underside] of one cookie with a generous amount of filling and gently sandwich it with a cookie of roughly the same size. Cookies stay fresh at room temperature in an airtight container for up to 5 days.


Man. These were good. Like, surprisingly good. Especially the filling.

It's good that I had to give them all away.

All but the two that I ate.

But nevertheless. Things would be much worse if I still had the plate sitting in front of me.


Omnomnom.

In other news, ONLY ONE WEEK UNTIL HARRY POTTER AND THE DEATHLY HALLOWS PART ONE.

It's going to be hard to contain my excitement in the next seven days.